Thursday, December 5, 2019

AME Role / Responsibility assignment to a user

For setting up standard attributes, users need to have AME responsibilities. Below are steps to do the same.

I) From System Administrator
1. Login as System Administrator user.
2. Select the responsibility “User Management”.
3. Select “Users” menu option
4. Search for the user to whom you wish to grant AME roles and click on ‘update’ icon
5. In the update user page, user details can be seen along with a list of roles available to user. Click on
‘Assign Roles’ button
6. Search for ‘Approval%Man%’ and it will give list of roles available.
7. Select Roles: 1) Approvals Management Administrator 2) Approvals Management business Analyst
8. Specify justification and relevant dates for the newly assigned roles, and click Apply to assign the
Roles to the user.

II) From Personal Login
  1. Navigate to the Personal Home Page.
  2. Select Functional Administrator Responsibility
  3. From the Grants page, press on the Create Grant button
4. Create a grant with the following information:
· Name <specify a descriptive name>
· Grantee Type = Specific User
· Grantee = <The user which you just created>
· Object = AME Transaction Types
5. Click next and select the Object Data Context
· Data Context Type = All Rows
6. Click Next to define the object parameters and Select Set
· Set = AME Calling Applications
7. Click Next, review the setups and then finish the process.
Now, User should be able to see ‘Approval Management Business Analyst’ responsibility in his/her home page. If not, please ‘Clear Cache’ from Functional Administrator Responsibility.

Pre-Requisites
Below are two Standard Attributes that need to be setup:
  1. The profile option AME: Installed should be ‘Yes’ either at the application or site level.
  2. Worklist is enabled for the users to receive notifications in the Application Worklist.
  3. Any Standard Attribute setup list ‘Allow Empty Approval Group’, ‘At least one rule must apply’ etc. need to be setup with required value as per requirements, before migrating Rules (If AME rules are planned to migrate through ldt files)

AME(Approval Management Engine) Setups

AME Setups

This Post is going to describe how to use AME for Requisition approvals. Purchase requisition and Purchase orders can be approved using AME. AME Stands for Approval Management Engine.

We are going to perform the setup steps one by one and see a demo test case. We are going to perform this case on R12.1.3

Setup Steps

1) AME Profile Options
2) Assign AME Roles and Responsibilities
3) Grant Transaction Type Access to User
4) Create New Transaction Types
5) Approval Process Setup
6) Enable AME for Requisition Approval


Step 2) Assign AME Roles and Responsibilities

Navigate to User Management Responsibility > Users

Query for the User. In our case its Apps_User


Click on Update and then Assign Roles


Now Query for "Approvals%" and select "Approval Management Administrator" and "Approval Management Business Analyst"


Click Select


Put some justification and click apply. A message will be displayed "You have successfully updated the information "


Step 3) Grant Transaction Type Access to User

Next step is to Grant Transaction Type Access to User.

Navigate to Functional Administrator >Security > Grants> Create Grants


Fill In below Information in the next form

Name = Apps_User Grants
Grantee Type = Specific User
Grantee = Apps_User
Object = AME Transaction Types


Click On next


Data Context Type = All Rows
Click Next


Set = AME Calling Applications

Click Next and review and clicking on Finish will display "Grant '' has been created successfully."

Step 4) Create new Transaction Type

You can use existing transaction type also or can create your own. Lets Create a new Transaction type.

Navigate to Approval Management Administrator (This Responsibility will be available now because it was assigned in step 2) and Click On "Create Transaction Type"


Enter Information as shown below or create your own Transaction type


Click Next, Select Line Item from Drop Down and Click "Go"


Change the Order Number to 2


Post below in the query. I copied it from earlier Requisition approval transaction type.

select prd.distribution_id from po_req_distributions_all prd, 
po_requisition_lines_all prl
where prl.requisition_header_id = po_ame_setup_pvt.get_new_req_header_id(:transactionId) 
and prl.requisition_line_id = prd.requisition_line_id  
and nvl(prl.cancel_flag, 'N') = 'N' 
and nvl(prl.modified_by_agent_flag, 'N') = 'N' 
order by prd.distribution_id 

Click on Validate, a message will be displayed "The query is valid" and now click on "Apply".

Click on Next and enter the details as shown in below screenshot.


Click on Validate Button after entering each value. Below are the value. I copy pasted from seeded transaction type defined

ALLOW_DELETING_RULE_GENERATED_APPROVERS=
select decode(PO_AME_SETUP_PVT.is_system_approver_mandatory(:transactionId), 
'N', 'true', 'false') 
from dual 

ALLOW_REQUESTOR_APPROVAL=
select decode (PO_AME_SETUP_PVT.can_preparer_approve(:transactionId),
'Y', 'true', 'false') 
from dual

WORKFLOW_ITEM_KEY=
select wf_item_key  from   po_requisition_headers_all where  requisition_header_id = po_ame_setup_pvt.get_new_req_header_id(:transactionId)


WORKFLOW_ITEM_TYPE=
select wf_item_type from   po_requisition_headers_all where  requisition_header_id = po_ame_setup_pvt.get_new_req_header_id(:transactionId)

Now Click On next and Finish Button. A confirmation message will be displayed as "Transaction type Mandeep Purchase Requisition Approval has been created successfully."

Step 5) Approval Process Setup

Next is to define Attributes, Conditions, Actions Types, Approval Group, Rules etc

Navigate to Approval Management Business Analyst > Business Analyst Dashboard

In Approval Process Setup, Query for Transaction Type as "Mandeep Purchase Requisition Approval".


Attributes:

Next Click on Attributes. Click On "Use Existing Attributes"


Now select the attributes as shown below and click Go


Select REQUISTION_TOTAL and Click On Continue


Select Usage Type as Dynamic and Copy below sql there

SELECT nvl(SUM(decode(order_type_lookup_code, 'RATE', amount, 'FIXED PRICE', amount, quantity * unit_price)), 0), po_ame_setup_pvt.get_function_currency(max(requisition_header_id)), po_ame_setup_pvt.get_rate_type(max(requisition_header_id)) from po_requisition_lines_all where requisition_header_id = po_ame_setup_pvt.get_new_req_header_id(:transactionId) and nvl(cancel_flag, 'N') = 'N' and nvl(modified_by_agent_flag, 'N') = 'N' 

Click on Validate and then Finish will display a message "Attribute REQUISITION_TOTAL has been created successfully."

Similarly do same for Item category. Click on Use Existing Attributes. Select Attributes as shown below


Select Item Category and click Continue


Select Usage Type as Dynamic and Copy below sql there

select mck.concatenated_segments from mtl_categories_b_kfv mck, po_requisition_lines_all prl, po_req_distributions_all prd where mck.category_id = prl.category_id and prl.requisition_line_id = prd.requisition_line_id and prl.requisition_header_id = po_ame_setup_pvt.get_new_req_header_id(:transactionId) order by prd.distribution_id


Also Add Below Attributes for selecting action types

TRANSACTION_REQUESTOR_PERSON_ID(Required for Supervisory level Action Type)


select nvl(PREPARER_ID, 0) from po_requisition_headers_all where REQUISITION_HEADER_ID = po_ame_setup_pvt.get_new_req_header_id(:transactionId)

And Now add

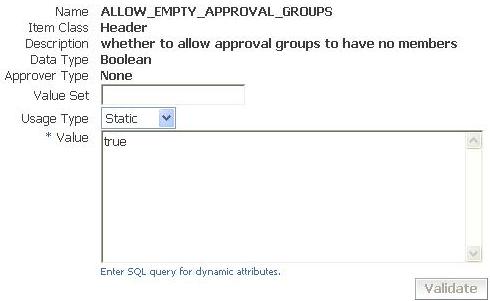
ALLOW_EMPTY_APPROVAL_GROUPS(Required for approval-group chain of authority Action Type)


Conditions:

Next is to specify Conditions. Click on Setups> Conditions > then click on Create


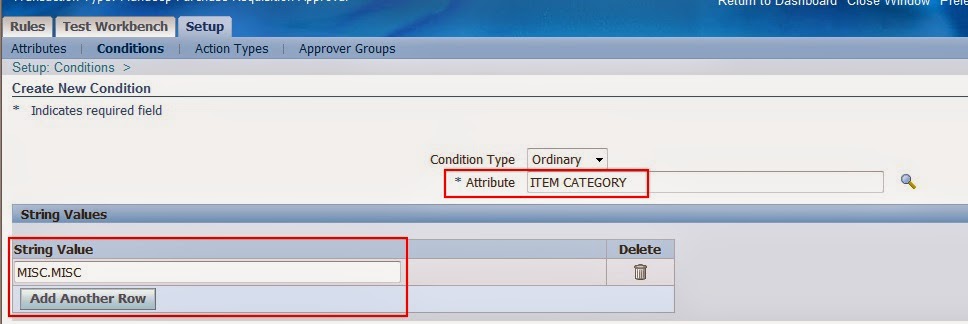
Condition for Item Category

Condition for Requisition Total


Action Types

Now click on action types and select use existing actions

Select below value and click Continue

  • Supervisory level
  • Approval-Group Chain of authority


and click on Finish "The selected action types have been added successfully."

Approver Groups

Now click on Approver Groups and click on Create Button.

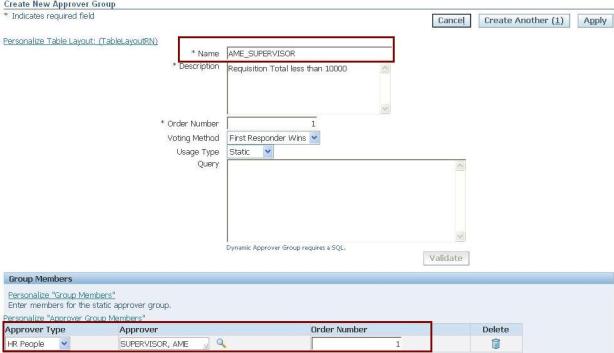
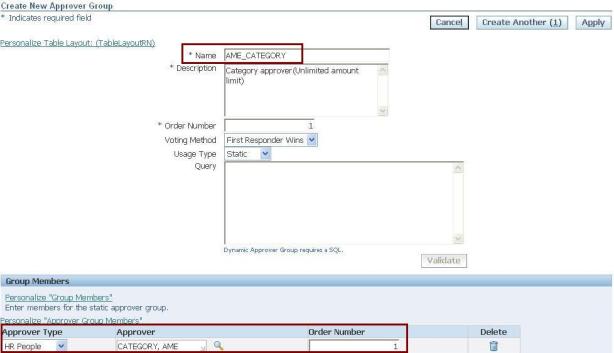
Enter Name, description , Order number, Voting Method. and add approvers


Click Apply. Similarly create other approver groups.


Give order number

AME Rule Setups

Now ;lets use condition and approver groups to create rules. Click on Rule


Click on Create.


Enter Rule details like Name, End date will automatically come and you can change it also. Click Next and Add Conditions.


Select Conditions which is created earlier or use from exiting conditions. Click Continue. You can add more conditions here and then click next and add actions


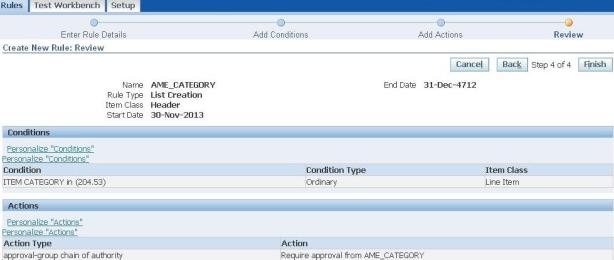
Click Next and Review


Click on Finish "Rule Supervisior has been created successfully".

Similarly create rule for Item Category Condition


Click Finish "Rule Item Category has been created successfully."

Step 6) Enable AME for Requisition Approval

Next step is to enable AME for requisition approval.

Navigate to Purchasing super user>Setup>Purchasing>Document Type and search for Purchase requisition


Add "Mandeep_Purchase_REQ" in Approval Transaction Type and save

This complete our AME setups.

Assign AME Roles & Responsibilities

Assign AME Roles and Responsibilities
1. Navigate to User Management Responsibility->Users and search for the user to whom you wish to grant AME roles. (Can navigate from any user which has Security Administrator Role or from SYSADMIN user).
2. Click on Update icon across the user name and in the update user page, click on Assign Role button.
3. Search for “Approval%” and select the Roles: Approvals Management Administrator & Approvals Management Business Analyst.
4. Specify justification and relevant dates for the newly assigned roles, and click Apply to assign the roles to the user.
Grant Transaction Type Access to Users
1. Navigate to Functional Administrator->Security->Grants and click on Create Grants button.
2. Create a grant with the following information:
  • Name
  • Grantee Type = ALL User
  • Object = AME Transaction Types
You can also set Grantee Type as Specific User and set the your user name as Grantee
3. Click Next button and select the Object Data Context as All Rows.
4. Click Next to define the object parameters and Select Set as AME Calling Applications
5. Click Next, review the setups and then Finish the process
Create new transaction Type
1. Navigate to Approvals Management Administrator responsibility->Admin Dashboard and click on Create Transaction Type button(Responsibility will be available because of the roles assigned)
We are going to create new transaction type in reference with seeded Purchase Requisition Approval transaction type.
2. Select the application and enter Transaction Type key & Transaction Type Name.Then Click Next button.
3. In the drop down,select Line Item and click on Go button.Another row for Line Item will be created.
Change the order number to 2 and then enter the SQL query in Query window.Click on Validate button and click on Apply button.
4. Click Next button and enter the details as in below screenshot.(Click Validate button after entering each query).
5. Click Next and then Finish button.
AME Setup
1. Navigate to Approvals Management Business Analyst Responsibility->Business Analyst Dashboard (Responsibility will be available because of the role assigned)
2. Use the Transaction Type LOV to search and select the transaction type.We are using the newly created transaction type “GOV Purchase Requisition Approval“.
Seeded Transaction types available for Purchase Requisitions are Purchase Requisition ApprovalInternal Requisition Approval and Requester Change Order Approval.
Attributes:
1. Select Attributes icon and click on Use Existing Attribute.
2. Under Search, select options as in below screenshot.After selecting REQUISITION_TOTAL and click on continue.
3. Select usage type as Dynamic. Enter the query,validate and click finish.
4. Similarly add ITEM_CATEGORY attribute also.
5 Also add below mentioned Attributes as its required for selecting some basic Action types
  • TRANSACTION_REQUESTOR_PERSON_ID(Required for Supervisory level Action Type)
  • ALLOW_EMPTY_APPROVAL_GROUPS(Required for approval-group chain of authority Action Type)
Condition:
1. Click on Conditions icon under setup tab.By default there are some conditions available.Still we can create new condition by clicking Create button.
2. Select the Attribute,enter the String value/Requisition Total and then click Apply button.
  • Condition for ITEM_CATEGORY
  • Condition for REQUISITION_TOTAL
  • Another condition for REQUISITION_TOTAL
3. You can see the newly created condition along with existing conditions
Action Types:
1. Click on Action Types icon under setup tab and then click on “Use Existing Action Type” button.
2. Select below mentioned types and click on Continue Button.
  • Supervisory level
  • approval-group chain of authority
3. Then click Finish button.
Approver Groups:
1. Click on Approver Groups icon under setup tab and then click on Create button.
2. Enter the Group Name,Description,Order Number and select the Voting method.Also add the approvers and click apply button.
3. Similarly create the remaining Approval Groups.
Rules Setup:
1. Click on Rules Tab and then on Create button.
2. Enter the Rule Name,select the Rule Type and click on Next button.
3. Add the Conditions using the Add Conditions button and click next button.
4. Click on Add Actions button to add actions,click next and then Finish.
5. Similarly create all rules.
  • AME_MANAGER
  • AME_CATEGORY
Enable AME for Requisition Approval
1. Navigate to Purchasing Super User->Setup->Purchasing->Document Types
2. Click update button against Purchase Requisition Document Type
3. Assign newly created transaction type to Approval Transaction Type
Testing
  • Requisition with total amount 900 USD (Less than 10000 USD)
  • Requisition with total amount 13500 USD(Greater than 10000 USD and less than 1000000 USD)
  • Requisition with total amount 1000 USD and using category “204.53”

SQL Important Queries

  How to delete rows with no where clause The following example deletes  all rows  from the  Person.Person  the table in the AdventureWork...